Deep dermal sutures (in which the knot is deeply buried beneath the plane of closure so that it will not interfere with epidermal healing) can be used to appose the dermis and hypodermis of wounds under tension in cosmetically important areas.
Indications for Deep Dermal Sutures
Deep wounds, when closing just the epidermal layer might leave significant pockets of dead space
Wounds under increased tension, which require strong dermal closure to heal optimally
Wounds prone to keloid formation, to minimize wound skin tension
Lacerations that require extended healing, in which a nonabsorbable dermal suture is left in place for a longer period than recommended with a surface suture
Contraindications for Deep Dermal Sutures
Absolute contraindications
None
Relative contraindications
Inadequate or thin dermal layer
Wound that cannot be adequately cleansed (however, there is no increased risk of infection using dermal sutures in clean wounds)
Deep dermal sutures do not appear to increase the risk of infection in clean, uncontaminated lacerations. However, animal studies suggest that deep sutures in contaminated wounds may have increase infection risk (16).
Sutures of any type may be contraindicated for wounds that are contaminated, relatively old, or that would be at higher risk of infection if closed by sutures, such as small bites to hands or feet, puncture wounds, or high-velocity missile wounds.
Wounds involving deep structures (eg, nerves, blood vessels, ducts, joints, tendons, bones) and those covering large areas or involving the face or hands may require specialized techniques or consultation by a surgical specialist.
Complications of Deep Dermal Sutures
Bleeding
Infection
Fibrosis
Equipment for Deep Dermal Sutures
Wound hygiene and closure are not required to be performed under sterile conditions (4, 5). Instruments that touch the wound (eg, forceps, needles, suture) must be sterile. Clean single-use nonsterile gloves as well as clean but not sterile water may be used in immunocompetent patients.
Clean procedure, barrier protection
Appropriate personal protective equipment (eg, face mask, safety glasses or a face shield, head cap, gown, gloves)
Sterile drapes, towels (for wound debridement and suturing)
Antiseptic solution (eg, chlorhexidine or povidone-iodine)Antiseptic solution (eg, chlorhexidine or povidone-iodine)
Suture tray (eg, needle driver, toothed forceps or tissue hook, scissors)
Absorbable suture (usually monofilament and usually 4-0 or 5-0, but sometimes 3-0)
Local anesthetic
Nonocclusive dressing
Antibiotic ointment
Additional Considerations for Deep Dermal Sutures
Monofilament suture material minimizes tissue reaction and inflammation, leading to better results. Monofilament is preferred to other suture types (eg, braided) except for lacerations under excessive tension (eg, in the tongue). Sizes 4-0 and 5-0 are used most often. However, size 3-0 may be needed, for example, for lacerations under tension (eg, those over joints).
Buried, absorbable dermal sutures (also called simple deep dermal sutures) do not appear to provoke more inflammation than percutaneous running sutures.
Because dermal sutures alone may not achieve perfect approximation of the vertical height of the wound edges, in cosmetic closures additional cutaneous sutures are often required (eg, simple interrupted or running sutures).
Relevant Anatomy for Deep Dermal Sutures
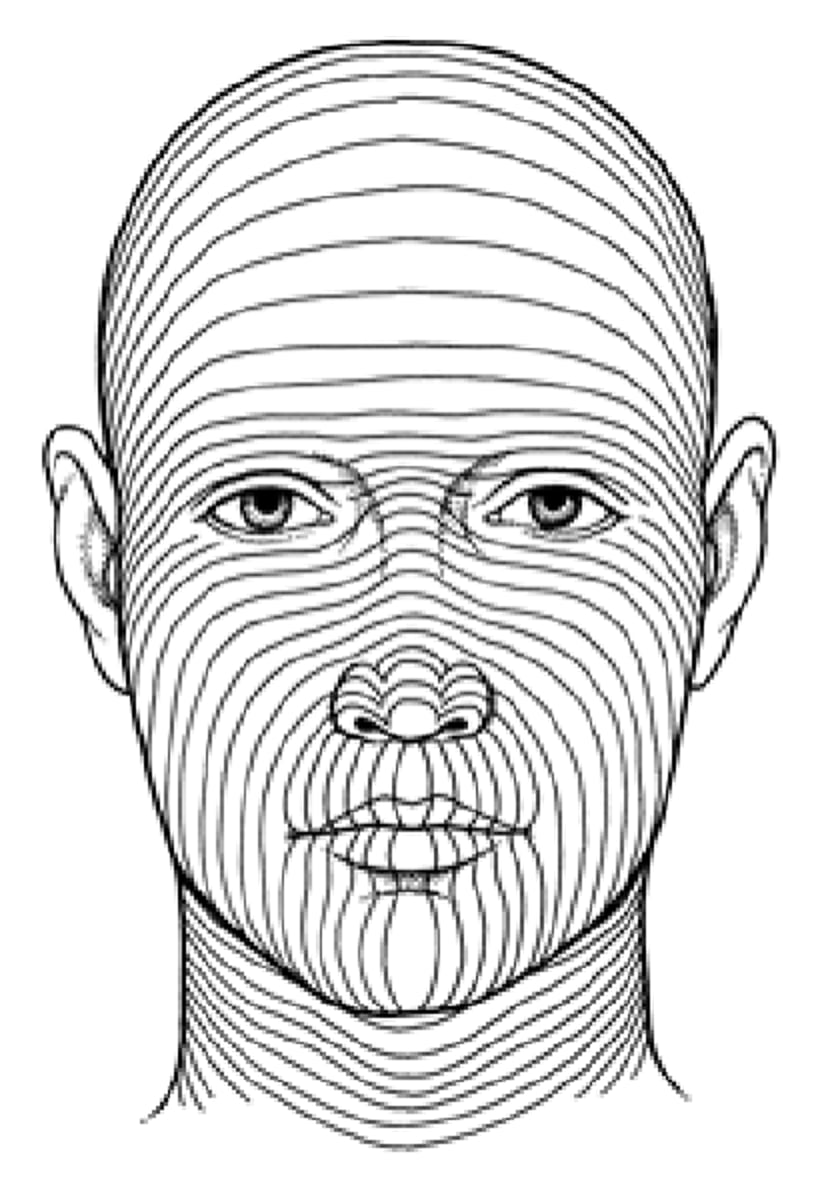
Consider using buried intradermal sutures for lacerations in cosmetically important areas that are subject to dynamic skin tension. (Skin tension lines in the face are shown in the figure Representative Minimal Skin Tension Lines.)
Representative Minimal Skin Tension Lines
Direction of force is along each line. Cuts perpendicular to these lines are thus under greatest tension and most likely to widen. |

Positioning for Deep Dermal Sutures
Position the patient comfortably reclined or supine.
Adjust the stretcher height so that you will be comfortable either sitting or standing at the bedside.
The laceration should be well lit, preferably with an overhead procedure light.
Step-by-Step Description of Deep Dermal Sutures
(See How To Cleanse, Irrigate, Debride, and Dress Wounds for step-by-step descriptions of wound preparation, anesthesia, and dressing; see How to Repair a Laceration With Simple Interrupted Sutures for instructions on how to handle the instruments, work with needles, insert simple interrupted sutures, and tie a surgeon's knot using instruments.)
The goal is to invert each suture, which buries the knot beneath the plane of closure so that it will not interfere with epidermal healing.
Cleanse, anesthetize, irrigate, and, if necessary, debride the wound.
Place a sterile fenestrated drape over the wound. Place additional drapes nearby as needed to provide a large enough sterile work area.
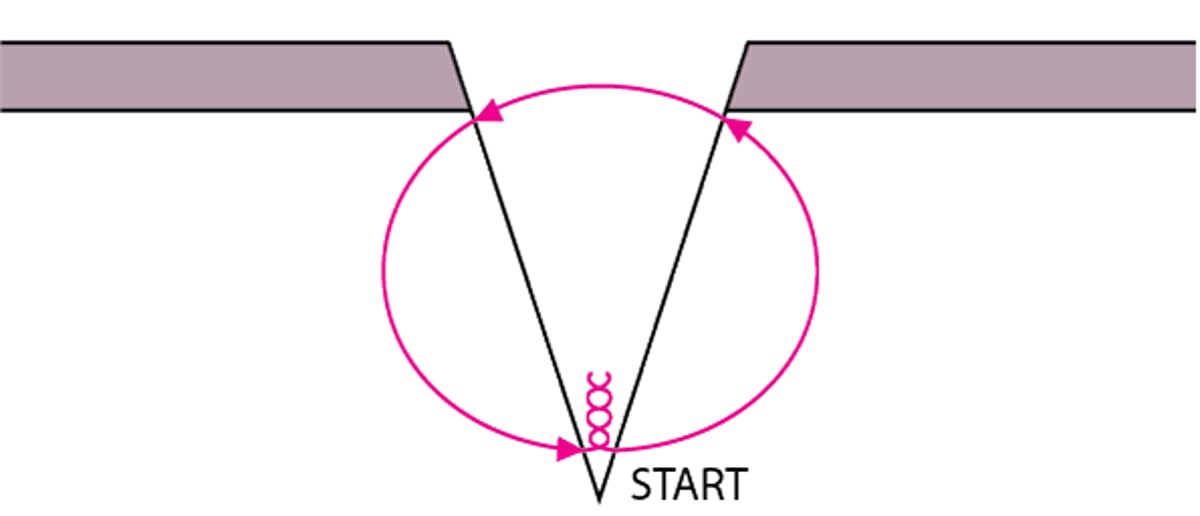
Insert the needle into the dermis at the bottom of the wound and direct it upward toward the skin surface, exiting near the dermal-epidermal junction on the same side.
Insert the needle on the opposite side of the wound near the dermal-epidermal junction, directly across from the point of exit. Take small bites to avoid puckering of the skin surface.
Exit the bite at the same dermal plane as and opposite the bite on the other side.
Tie the knot, using 3 or fewer throws.
Cut the suture, leaving approximately a 3-mm tail.
If needed to help achieve precise skin approximation, suture the skin. Place a fine (eg, 6-0) running skin suture. At one end of the laceration tie a simple suture with a knot but leave the needle and suture attached. Evert the skin edges along the length of the laceration if possible. Advance the needle, taking small bites at a 45-degree angle to the long axis of the laceration (perpendicular to the skin) for the complete length of the laceration. After the final bite, extend a loop of suture from the wound and use this loop as one end of suture for the final tie. Simple interrupted sutures can also be used.
Buried (Simple) Deep Dermal Suture
The suture begins and ends at the bottom of the wound so that the knot is deeply buried. |

Aftercare for Deep Dermal Sutures
Dress the wound (see Lacerations and How To Cleanse, Irrigate, Debride, and Dress Wounds).
Splint joints if movement will cause wound tension (eg, an elbow splint for a dorsal elbow laceration).
Instruct the patient to keep the dressing dry and in place and to return in 2 days for a wound check.
Instruct the patient to return sooner if signs of infection develop (eg, increased pain, swelling, erythema, fever, proximally spreading red streaks [infectious lymphangiitis]).
If non-absorbable sutures are used for skin approximation, instruct the patient when to return for skin suture removal, which is generally based on the wound site: 3 to 5 days for the face, 6 to 10 days for the scalp and trunk, 10 to 14 days for the arms and legs, and 14 days for wounds overlying joints. Early suture removal risks wound dehiscence; however, to decrease scarring and cross-hatching of facial sutures, half of the suture line (ie, every other suture) may be removed on day 3 and the remainder removed on day 5.
Warnings and Common Errors for Deep Dermal Sutures
Deep dermal sutures do not appear to increase the risk of infection in clean, uncontaminated lacerations. However, animal studies suggest that deep sutures should be avoided in highly contaminated wounds.
Use no more than 3 throws per knot and the fewest number of sutures possible.
Tips and Tricks for Deep Dermal Sutures
Consider deep dermal sutures particularly for children, who are more likely than adults to develop suture marks.
If surface sutures are not used, apply skin tape to correct surface unevenness and to provide more accurate apposition of the epidermis.