Reduction of the mandibular temporomandibular joint (TMJ) can be done using a simple manual technique.
(See also Dental Emergencies and Mandibular Dislocation.)
Mandibular dislocation usually occurs in people with a history of such dislocation. It typically occurs when the mouth is opened wide (eg, while biting into a large sandwich, during a wide yawn, or during a dental procedure).
Indications for Reducing a Mandibular Dislocation
Uncomplicated anterior TMJ dislocation
Contraindications to Reducing a Mandibular Dislocation
Absolute contraindications
Associated fracture
Lateral, medial, superior, or posterior TMJ dislocations
Patients with these conditions should be managed by an oral and maxillofacial surgeon.
Complications of Reducing a Mandibular Dislocation
Mandibular fracture (rare)
Displacement of preexisting fracture
Avulsion of the TMJ fibrocartilage
Mandibular fractures may not be recognized until the patient's pain persists after the TMJ reduction.
Equipment for Reducing a Mandibular Dislocation
Nonsterile gloves
Dental chair or straight chair with head support
Gauze pads or thumb wraps to prevent biting of the operator's hands
TMJ dislocations can typically be reduced without procedural sedation or local anesthetic injection of the TMJ, but such measures may be necessary for uncooperative patients or when dislocation has been present for more than a few hours. Additional materials needed include:
Procedural sedation supplies: Injectable diazepam or midazolam and an opioid such as fentanyl; equipment for peripheral venous catheterizationProcedural sedation supplies: Injectable diazepam or midazolam and an opioid such as fentanyl; equipment for peripheral venous catheterization
Injectable local anesthesia supplies: Lidocaine 2% Injectable local anesthesia supplies: Lidocaine 2%without epinephrine; 27-gauge, 2-cm long needle; 3-mL syringe, topical antiseptic (eg, chlorhexidine, povidone iodine)epinephrine; 27-gauge, 2-cm long needle; 3-mL syringe, topical antiseptic (eg, chlorhexidine, povidone iodine)
Additional Considerations for Reducing a Mandibular Dislocation
Perform TMJ reduction promptly. Reduction becomes more difficult with passing time.
TMJ dislocation can be painful and patients are sometimes anxious, but this can often be ameliorated by gentle, calm reassurance. Local anesthetic injection of the joint and muscles of mastication is rarely needed.
Procedural sedation is usually not needed. The need for sedation vs the risks (particularly in older patients) and increased time required should be weighed carefully.
If readily available, do a panoramic jaw radiograph for patients with a possible non-anterior TMJ dislocation. However, a radiograph is not always needed for a nontraumatic dislocation, especially if the patient has a history of prior dislocations.
Perform a CT scan for traumatic TMJ dislocation.
Closed-reduction attempts may fail and require reduction under general anesthesia.
Relevant Anatomy for Reducing a Mandibular Dislocation
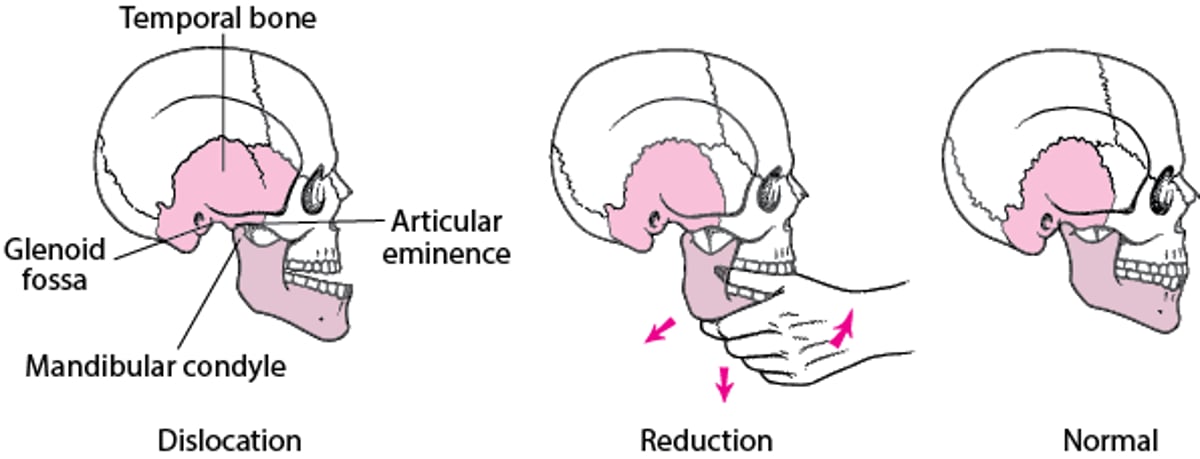
The TMJ is formed by the mandibular condyle and the glenoid fossa of the temporal bone.
Anterior TMJ dislocation occurs when a condyle moves forward out of the fossa and becomes lodged anteriorly in front of the articular eminence.
TMJ dislocation stretches the ligaments of the masseter, medial and lateral pterygoid, and temporalis muscles, causing painful spasms (trismus). Trismus prevents the condyle from returning to the mandibular fossa, which prevents closure of the mouth.
When the condyle is restored into the fossa, the jaw will snap closed under the force of the muscles in spasm, which puts both the patient's tongue and the operator's thumbs in danger of being bitten.
Spontaneous TMJ dislocations are more often bilateral than unilateral.
Positioning for Reducing a Mandibular Dislocation
Seat the patient upright or slightly reclined.
Stabilize the patient's head firmly against the chair back/headrest.
Stand in front of the patient such that your elbows are at or above the level of the mandible.
Step-by-Step Description of Reducing a Mandibular Dislocation
Elicit patient relaxation and cooperation
It is important to allay anxiety and obtain cooperation before attempting reduction.
In a calm, reassuring voice, explain to the patient that the
Condition can be treated successfully, but that full cooperation is necessary
Mouth and jaw need to be relaxed and the procedure should not be resisted
Jaw will feel pressure but not sharp pain
Head needs to remain solidly on the headrest as the jaw is put back in place
If the patient remains unable to relax and cooperate with the reduction, give procedural sedation and analgesia as needed.
Optional: Administer local anesthetic injection
Externally palpate the TMJ space, just below the zygoma and approximately 2.5 cm anterior to the tragus.
Swab the area with antiseptic solution and allow it to dry for at least 1 minute.
Insert the needle perpendicularly to the skin and advance it medially, approximately 0.5 cm, into the joint space.
Aspirate, to exclude intravascular placement.
Slowly inject approximately 1 mL anesthetic.
Massage the site to hasten the onset of anesthesia.
Distract the condyles and reduce the jaw
Instruct the patient to completely relax the mouth and jaw. Consider oral or intravenous administration of benzodiazepines or diprivan for anxiolysis; muscle relaxants may assist with attempted reduction of the dislocation.
Stabilize the head. Instruct the patient to keep the head still and firmly braced against the headrest.
Wear nonsterile gloves.
Place your thumbs on the external oblique ridge on either side of the mandible, lateral to the third molar area. Alternatively, wrap your thumbs with layers of gauze and place them as posteriorly as possible on the occlusal surface of the lower molars bilaterally (this increases the risk of being bitten during reduction).
Curl your other fingers around and under the mandible, with the index fingers behind the rami. Fingers should be in contact with the bony mandible, not the soft tissues beneath the tongue.
First, apply firm and continuous downward force on the back of the jaw, using your thumbs to distract the condyles inferiorly. This is a steady, firm force, not a sudden, jerking, thrusting force.
Simultaneously apply a reciprocal upward force on the anterior mandible (ie, rock the chin upward), which may enhance the condylar distraction.
Then, maintaining these distraction forces, apply posterior force on the dislocated side, or both sides if the dislocation is bilateral, to reduce the condyle(s) (ie, push the mandible back into normal position).
The key is to first apply significant pressure downward in the back of the jaw, then slowly guide the entire mandible posteriorly: "Down … then back." Often the mandible will snap into position as the condyles clear the articular eminence.
Repeated unsuccessful attempts may result in severe myospasm which would require administration of procedural sedation (eg, propofol) or even of paralytics in a critical care or operating room setting for advanced airway management for successful reduction.Repeated unsuccessful attempts may result in severe myospasm which would require administration of procedural sedation (eg, propofol) or even of paralytics in a critical care or operating room setting for advanced airway management for successful reduction.
Determine successful TMJ reduction
Successful TMJ reduction restores the patient's ability to close the mouth, although soreness from muscle spasms will linger.
Instruct the patient to feel if the teeth seem to come together normally as they slightly open and close the jaw. Tell the patient not to open wide to check.
Mandibular Reduction

Aftercare for Reducing a Mandibular Dislocation
Instruct the patient to apply moist heat and if needed take a nonsteroidal anti-inflammatory drug (NSAID) such as ibuprofen.Instruct the patient to apply moist heat and if needed take a nonsteroidal anti-inflammatory drug (NSAID) such as ibuprofen.
Have the patient avoid wide mouth-opening for 4 to 6 weeks.
Recommend a soft diet eaten with small bites.
Instruct the patient who needs to yawn to place a closed fist beneath the chin and press upward to prevent wide opening.
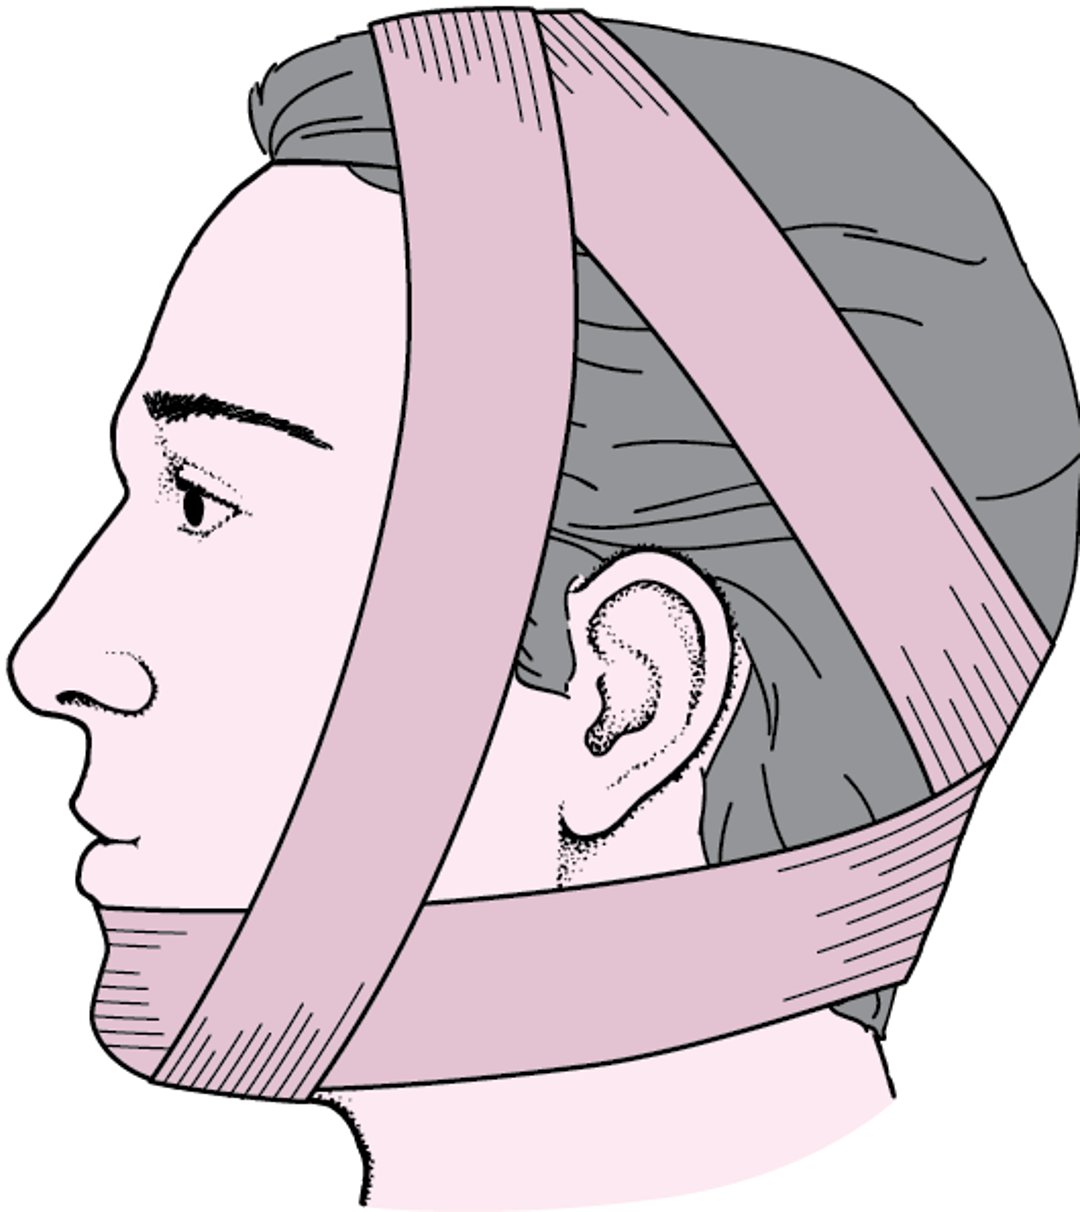
Wrap the patient's head in a Figure-of-8 (Barton's) bandage (stretch gauze or an elastic wrap) to limit maximal jaw opening for 2 to 3 days. Patient compliance may be an issue because of discomfort wearing the bandage and difficulty eating and drinking.
Arrange a follow-up visit with the oral surgeon or otolaryngologist within 1 to 2 days.
Barton's Bandage

Warnings and Common Errors for Reducing a Mandibular Dislocation
If the operator's thumbs are positioned on the occlusal surfaces of the molars, they are at significant risk of being bitten when the mandible snaps into its normal position. Placing the thumbs on the external oblique ridges is, therefore, recommended.
Tips and Tricks for Reducing a Mandibular Dislocation
Patients are often very anxious, so they resist the procedure and try to close the mandible themselves. Reassuring the patient, attaining jaw relaxation, and ensuring patient cooperation are key to a successful reduction.
Drug Information for the Topic