An inferior alveolar nerve block, the most common dental nerve block, anesthetizes the ipsilateral hemi-mandible (including teeth and bone), as well as the lateral (buccal) mucosa over the lower incisors, canine, and first premolar, and, cutaneously, the ipsilateral lower lip and chin.
The lingual nerve lies nearby and is usually blocked incidentally, anesthetizing the ipsilateral floor of the mouth, medial (lingual) gingiva, and anterior two-thirds of the tongue.
A buccal block (of the long buccal nerve) is often performed as part of the inferior alveolar nerve block procedure, if anesthetization of the lateral (buccal) gingiva and mucosa of the lower molars and second premolar is needed.
Indications for Inferior Alveolar Nerve Block
A painful mandibular condition or its treatment, such as
Fracture (of mandibular bone, alveolar ridge, teeth)
Dental abscess (only if the abscess is distant from the nerve block site)
Laceration (mucosa, lower lip, skin of chin)*
* A nerve block may be preferred to local anesthetic infiltration when accurate approximation of wound edges is important (eg, skin or lip repair) because a nerve block does not distort the tissue as does local infiltration.
Contraindications to an Inferior Alveolar Nerve Block
Absolute contraindications
Allergy to the anesthetic agent or delivery vehicle (can usually choose different anesthetic)
Absence of anatomic landmarks needed to guide needle insertion (eg, due to trauma)
Relative contraindications
Infection in the path of needle insertion: Use procedural sedation or other anesthesia.
Coagulopathy*: When feasible, correct prior to procedure.
Pregnancy: While many guidelines state that patients can be safely treated throughout the entirety of their pregnancy, truly elective treatment should ideally be deferred during the first trimester to prevent potential harm to the developing child (1).
* Therapeutic anticoagulation (eg, for pulmonary embolism) increases the risk of bleeding with nerve blocks, but this must be balanced against the increased risk of thrombosis (eg, stroke) if anticoagulation is reversed. Discuss any contemplated reversal with the clinician managing the patient's anticoagulation and then with the patient.
Contraindications reference
1. Bao J, Huang X, Wang L, He Y, Rasubala L, Ren YF. Clinical practice guidelines for oral health care during pregnancy: a systematic evaluation and summary recommendations for general dental practitioners. Quintessence Int. 2022;53(4):362-373. doi:10.3290/j.qi.b2644863
Complications of an Inferior Alveolar Nerve Block
Allergic reaction to the anesthetic
Toxicity due to anesthetic overdose (eg, seizure, cardiac arrhythmias)
Intravascular injection of anesthetic/epinephrineIntravascular injection of anesthetic/epinephrine
Hematoma
Neuropathy
Spread of infection, by passing the needle through an infected area
Anesthetization of branches of facial nerve (cranial nerve VII) due to excessively posterior needle placement
Failure to anesthetize
Needle breakage and loss of needle within soft tissues
Most complications result from inaccurate needle placement.
Equipment for an Inferior Alveolar Nerve Block
Dental chair, straight chair with head support, or stretcher
Light source for intraoral illumination
Nonsterile gloves
Mask and safety glasses, or a face shield
Gauze pads
Cotton-tipped applicators
Dental mirror or tongue blade
Suction
Equipment to do local anesthesia
Topical anesthetic ointment* (eg, lidocaine 5%, benzocaine 20%)Topical anesthetic ointment* (eg, lidocaine 5%, benzocaine 20%)
Injectable local anesthetic such as lidocaine 2% with epinephrine† 1:100,000 or, for longer duration anesthesia, bupivacaine 0.5% with epinephrine† 1:200,000 Injectable local anesthetic such as lidocaine 2% with epinephrine† 1:100,000 or, for longer duration anesthesia, bupivacaine 0.5% with epinephrine† 1:200,000
Dental aspirating syringe (with narrow barrel and custom injectable anesthetic cartridges) or other narrow barrel syringe (eg, 3 mL) with locking hub
25- or 27-gauge needle: 3-cm long for nerve blocks
* CAUTION: All topical anesthetic preparations are absorbed from mucosal surfaces, and toxicity may result when dose limits are exceeded. Ointments are easier to control than less-concentrated topical liquids and gels. Excess benzocaine rarely may cause methemoglobinemia.* CAUTION: All topical anesthetic preparations are absorbed from mucosal surfaces, and toxicity may result when dose limits are exceeded. Ointments are easier to control than less-concentrated topical liquids and gels. Excess benzocaine rarely may cause methemoglobinemia.
† Maximum dose of local anesthetics in adults: Lidocaine without epinephrine, 5 mg/kg with total maximum dose of 300 mg; lidocaine with epinephrine, 7 mg/kg with total maximum dose of 500 mg; bupivacaine without epinephrine, 2 mg/kg with total maximum dose of 175 mg. NOTE: A 1% solution (of any substance) represents 10 mg/mL (1 gm/100 mL). Epinephrine causes vasoconstriction, which prolongs the anesthetic effect; this is useful in well-vascularized tissues such as the oral mucosa. Patients with cardiac disease should receive only limited amounts of epinephrine (maximum 3.5 mL of solution containing 1:100,000 epinephrine); alternatively, use local anesthetic without epinephrine.† Maximum dose of local anesthetics in adults: Lidocaine without epinephrine, 5 mg/kg with total maximum dose of 300 mg; lidocaine with epinephrine, 7 mg/kg with total maximum dose of 500 mg; bupivacaine without epinephrine, 2 mg/kg with total maximum dose of 175 mg. NOTE: A 1% solution (of any substance) represents 10 mg/mL (1 gm/100 mL). Epinephrine causes vasoconstriction, which prolongs the anesthetic effect; this is useful in well-vascularized tissues such as the oral mucosa. Patients with cardiac disease should receive only limited amounts of epinephrine (maximum 3.5 mL of solution containing 1:100,000 epinephrine); alternatively, use local anesthetic without epinephrine.
Additional Considerations for an Inferior Alveolar Nerve Block
Document any preexisting nerve deficit before doing a nerve block.
Sedation may be needed for patients unable to cooperate with the procedure.
Nerve block may be ineffective if the anesthetic is not placed sufficiently close to the nerve.
Use a new needle with each attempt (the previous needle may have become blocked with tissue or blood, which would thus obscure inadvertent intravascular placement).
Stop the nerve block procedure and use a different method of anesthesia if you are unsure where the needle is or if the patient is uncooperative.
Relevant Anatomy for an Inferior Alveolar Nerve Block
The inferior alveolar nerve is a branch of the mandibular nerve, which is the third branch of the trigeminal nerve.
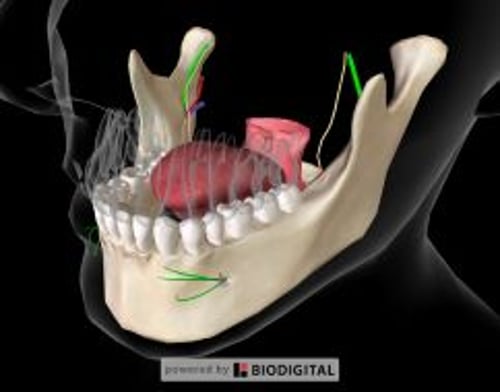
The inferior alveolar nerve travels inferiorly and anteriorly on the medial side of the mandibular ramus. The nerve, accompanied by the inferior alveolar artery and vein, enters the mandibular foramen near the midpoint of the ramus. From this point, the nerve runs within and innervates the body of the mandible; a terminal branch, the mental nerve, reemerges through the mental foramen in the premolar region to innervate the lower lip and chin, as well as the lateral mucosa/gingiva overlying the lower incisor teeth, canine, and first premolar. After this branching, the inferior alveolar nerve continues anteriorly as the incisive nerve, to innervate the remaining teeth and bone anterior to the mental foramen up to the midline.
The lingula is the bony protuberance at the anterior margin of the mandibular foramen.
The coronoid notch (retromolar fossa) is the concavity of the anterior edge of the ramus, located posterior to the molars.
The pterygomandibular triangle is a fatty space bordered laterally by the coronoid notch, and medially by the pterygomandibular raphe.
The pterygomandibular raphe is a thin vertical band (a visible tendinous line where the buccinator and the superior pharyngeal constrictor muscles join) that borders the pterygomandibular triangle medially.
The needle is inserted posterolaterally into the pterygomandibular triangle, parallel to and approximately 1 cm above the mandibular occlusal plane. The needle will encounter resistance as it passes through muscle and connective tissue.
The anesthetic is ideally placed superiorly and posteriorly adjacent to the lingula (ie, just above the mandibular foramen).
The lingual nerve (also a branch of the mandibular nerve) runs near the injection zone and is typically anesthetized incidental to the inferior alveolar nerve block.
Positioning for an Inferior Alveolar Nerve Block
Position the patient slightly inclined (semi-recumbent sitting position), with the occiput supported and the mouth opened wide, such that the injection site (medial side of the ramus) is accessible.
Right-handed operators should stand on the patient's right and left-handed operators on the patient's left.
Step-by-Step Description of an Inferior Alveolar Nerve Block
Preparation
Wear nonsterile gloves and a mask and safety glasses, or a face shield.
Use gauze to thoroughly dry the pterygomandibular triangle. Use suction as needed to keep the area dry.
Apply a small amount of topical anesthetic with cotton-tipped applicators and wait 2 to 3 minutes for the anesthesia to occur.
Inject the local anesthetic
Instruct the patient to open the mouth comfortably wide.
Place the tip of your thumb or forefinger into the coronoid notch, to help visualize the vertical height at which the needle will enter, and retract the cheek to expose the pterygomandibular triangle.
Place and maintain the barrel of the syringe over the contralateral lower first and second premolars.
Keep the needle parallel to—and approximately 1 cm above—the mandibular occlusal plane, at the vertical plane of the coronoid notch.
To establish the correct angle of approach and entry point, rest the side of the needle tip against the lateral edge of the pterygomandibular raphe, such that the tip now aims into the pterygomandibular triangle, with the bevel facing the ramus. Maintain this angle of insertion as you advance the needle.
Advance the needle tip slightly into the mucosa. Aspirate, to exclude intravascular placement, and inject a few drops of anesthetic to relieve the pain of the needle insertion itself. Repeat these small injections after incremental advancements of slightly < 1 cm.
If the patient experiences a sudden, sharp paresthesia, reassure the patient that this indicates the needle is in the correct location. Slightly withdrawing and then redirecting the needle may relieve this sensation, but maintain direction toward the medial ramus and mandibular foramen.
Advance the needle until it is stopped by the ramus (typically after approximately 2 to 2.5 cm of insertion) and withdraw needle 1 mm away from bone.
If the needle does not make contact with mandibular bone, it may be too far posterior (eg, into the parotid). Withdraw the needle and redirect it (more anteriorly/laterally).
Once contact with the ramus is made, withdraw the needle 1 mm away from the bone.
Aspirate, to exclude intravascular placement.
If aspiration reveals intravascular placement, withdraw the needle 2 to 3 mm, then re-aspirate prior to injection.
Slowly inject approximately 2 to 4 mL anesthetic, but leave approximately 0.5 mL in the syringe to block the buccal nerve.
Block the buccal nerve
Withdraw the syringe and reinsert it just anterior and lateral to the anterior edge of the ramus at the level of the occlusal surface of the most posterior molar. Advance the needle posteriorly approximately 3 to 5 mm. Aspirate, to exclude intravascular placement, and inject approximately 0.25 mL of anesthetic.
Massage the injection sites to hasten the onset of anesthesia.

Aftercare for an Inferior Alveolar Nerve Block
Have the patient rest, with mouth relaxed, while awaiting onset of anesthesia (5 to 10 minutes).
Warnings and Common Errors for an Inferior Alveolar Nerve Block
To minimize the risk of needle breakage, do not bend the needle prior to insertion, do not insert the needle to its full depth (ie, to the hub), and instruct the patient to remain still, with the mouth wide open, and resist grabbing your hand.
Articaine 4% with epinephrine 1:100,000 may be used for Articaine 4% with epinephrine 1:100,000 may be used forsupraperiosteal infiltration, but it is not recommended for nerve block procedures, due to a reported risk of protracted lingual nerve paresthesia (1).
Warnings and common errors reference
1. Hopman AJG, Baart JA, Brand HS. Articaine and neurotoxicity - a review. Br Dent J. 2017;223(7):501-506. doi:10.1038/sj.bdj.2017.782
Tips and Tricks for an Inferior Alveolar Nerve Block
Distraction techniques (eg, talking to the patient or having the patient hold someone else's hand) may help to reduce patient anxiety.
Inject the local anesthetic solution slowly (30 to 60 seconds) to reduce the pain of injection.