E-FAST (Extended Focused Assessment with Sonography in Trauma) is a bedside ultrasound protocol designed to detect peritoneal fluid, pericardial fluid, pneumothorax, and/or hemothorax in a trauma patient.
The FAST (Focused Assessment with Sonography in Trauma) examination looks for the presence of fluid—presumed to be blood in the appropriate clinical setting—visualizing 10 structures or spaces in 4 areas:
Pericardial
Perihepatic
Perisplenic
Pelvic
The E-FAST (Extended-FAST) additionally surveys the anterior and lateral pleural spaces (thoracic view) to evaluate for a pneumothorax or pleural effusion, assumed to be a hemothorax in trauma patients.
E-FAST has moderate sensitivity and high specificity in identifying pneumothorax, intra-abdominal free fluid, and pericardial effusion (1). It can be done quickly, noninvasively, and without radiation exposure, and may be repeated for serial examinations. Due to these benefits, ultrasound has essentially replaced diagnostic peritoneal lavage (DPL) in evaluation of trauma patients. However, because of only moderate sensitivity, E-FAST is not as reliable to exclude pneumothorax, intra-abdominal free fluid and pericardial effusion (1).
In a patient who is hemodynamically unstable, a positive E-FAST may indicate the need for immediate intervention (eg, tube thoracostomy, pericardial window, diagnostic laparotomy).
In a patient who is hemodynamically stable, the E-FAST can direct further diagnostic testing.
Although E-FAST was designed to expedite care in injured patients, the components have also been used in evaluating patients who have not sustained traumatic injuries as a point-of-care ultrasound (POCUS) for patients who are hypotensive but not injured to identify free fluid as a result of other causes (eg, ruptured ectopic pregnancy, ruptured abdominal aortic aneurysm).
E-FAST is used by some pre-hospital professionals to evaluate for peritoneal or pleural free fluid, which may identify severe hemorrhage (2). Prehospital identification of severe hemorrhage may allow for decreased time to definitive treatment (eg, administration of blood products or surgical intervention).
Indications for E-FAST Examination
Evaluation of injury, hypotension, and/or shock of unknown etiology in a trauma patient to determine need for interventions
Evaluation of unexplained hypotension or shock in a patient without trauma
To identify rupture of an ectopic pregnancy
Contraindications to E-FAST Examination
Absolute contraindications:
Clear need for time-sensitive definitive care that would be delayed by doing ultrasound (eg, laparotomy)
Relative contraindications:
None
Complications of E-FAST Examination
Ultrasound is a noninvasive procedure, thus procedural complications are unlikely.
Equipment for E-FAST Examination
Bedside ultrasound machine
Low-frequency (eg, 2 to 5 MHz) probe (transducer), either curvilinear or phased-array*
High-frequency (eg, 5 to 10 MHz) linear probe, for examining the pleura
Ultrasound gel (nonsterile) or water-based surgical lubricant
Ultrasound probe cover (or glove to cover probe tip) to provide barrier protection
* A phased array probe is often preferred for E-FAST because its small footprint can more readily be placed between the ribs.
Additional Considerations for E-FAST Examination
The E-FAST examination should be completed in < 5 minutes.
The pericardial sac is evaluated first, especially after penetrating trauma, because pericardial fluid after trauma can be immediately life-threatening and management supersedes treatment of other injuries.
The E-FAST examination maximizes sensitivity by imaging dependent positions in the peritoneal cavity where fluid preferentially accumulates. This fluid appears as anechoic (black) areas filling the potential spaces. The examination also focuses on interfaces between solid organs in order to maximize fluid visibility.
Positioning for E-FAST Examination
The patient is supine.
The operator stands at the patient's side near the abdomen. (Traditionally, operators were taught to be at the patient's right side so that the right hand could be used; however, operator position can be based on the operator's preference.)
If possible, the patient can be placed in about 5 degrees of Trendelenburg position to increase sensitivity for detection of peritoneal fluid in the right upper quadrant.
Relevant Anatomy for E-FAST Examination
The right paracolic gutter is deeper and less obstructed than the left. Fluid preferentially flows to the right. Thus, this area should be the first in the peritoneum to be evaluated (normally after the pericardium has been imaged).
A potential space is formed by the reflection of the peritoneum from the rectum to the bladder in males or from the rectum to the uterus in females. Fluid preferentially flows into this area from the right or left paracolic gutters. The pelvis is one of the most dependent and easily visualized portions of the peritoneal cavity; thus, fluid collections are visible here earlier than in other areas.
Step-by-Step Description of E-FAST Examination
Use a curvilinear probe or a phased array probe.
Standard probe orientation: Ensure that the screen image correlates with the spatial orientation of the probe as you are holding and moving it. The probe orientation marker on the probe tip corresponds to the marker dot on the ultrasound monitor. Adjust the monitor settings and probe position if needed to attain an accurate left-right orientation. Traditionally, when obtaining images for an E-FAST examination, position the probe orientation marker on the patient's right side and check that the marker dot on the ultrasound monitor is at the upper left corner of the monitor.
Coat the probe tip with ultrasound gel, pull a probe cover or glove tightly over the probe tip to eliminate all air bubbles, and secure the cover or glove in place (eg, with rubber bands).
Coat the covered probe generously with gel; inadequate use of gel limits the view of relevant anatomy.
Pericardial view (cardiac)
The cardiac portion of the E-FAST examination looks for hemopericardium, which, in trauma, is most easily imaged from the subxiphoid position.*
* NOTE: Conventional cardiology orientation is the opposite of all other scans with the marker dot on the right side of the monitor. When obtaining short axis views, the probe orientation mark will be on the patient's left side and when obtaining long axis views, the probe orientation mark will be directed toward the patient's head.
When using the emergency medicine or radiology orientation, hold the probe transversely in the subcostal region almost parallel to the skin and pointed just to the left of the patient's sternum and toward the head. The probe orientation marker should be on the patient's right side.
Move the transducer further to the patient' s right; the liver edge should come into view, making the left lobe of the liver usable as an acoustic window.
Hold the probe down on the patient's skin and gently push it down, pointing it between the patient's head and left shoulder.
Move the probe as high into the subxiphoid space as possible.
On the ultrasound monitor, from top to bottom, observe the liver, right ventricle, and left ventricle. The right ventricle is adjacent to the liver because it is more anterior than the left ventricle. The 2 ventricles are up and to the right side of the monitor and the atria are down and to the left.
To improve the image, increase the probe depth setting on the console or bring the heart closer to the probe by having the patient take and hold a deep breath.
Pericardial fluid appears as a black (hypoechoic) space between the white lines of the pericardium.
Pleural fluid can be confused with a pericardial effusion and can be distinguished by its appearance behind the descending aorta on the parasternal long axis view of the heart.
An epicardial fat pad can also be confused with pericardial fluid. Epicardial fat pads appear echolucent but move with the heart as opposed to pericardial fluid, which is stationary.
Perihepatic view (right upper quadrant)
Move the probe to the right upper quadrant, to identify free intraperitoneal fluid.
Place the probe in the 10th or 11th intercostal space, just anterior to the midaxillary line. Point the probe orientation marker cephalad. To eliminate rib shadows, rotate the probe and look between ribs.
Image the interface (potential space) between the right kidney and the liver, called Morison pouch. If only the kidney is visible, slide the probe cephalad along the midaxillary line one rib space at a time until the liver is visible. If only the liver is visible, slide the probe caudad one rib space at a time until the kidney is visible. A common error is placing the probe too anterior on the abdomen; sliding the probe posterior can then help to visualize the kidney.
In the right upper quadrant view, Morison pouch is the most common location to visualize free fluid. Sweep through the entire length of the kidney to avoid missing a small fluid collection.
Move the probe to look for a hemothorax. The diaphragm appears as a bright white curvilinear line with the liver to the right and normal lung to the left. Normal lung scatters ultrasound waves and appears like snow.
A hemothorax appears hyperechoic. Also, the spinous line, visible at the bottom of the monitor, will continue past the diaphragm and into the chest. The blood in the hemithorax acts as an acoustic window that allows visualization of the spine. This finding is called the abnormal continuation of the spinous line (the "spine sign") and does not occur in the absence of a hemothorax, because air in the lungs scatters ultrasound waves, obscuring visualization of the spinous line.
Perisplenic view (left upper quadrant)
Move the probe to the left upper quadrant to identify free intraperitoneal fluid.
The left kidney is located slightly more posterior and cephalad than the right kidney, so place the probe on the posterior axillary line between the 9th and 10th intercostal space with the probe orientation marker cephalad.
The left upper quadrant is a mirror image of the right, with the spleen appearing at the top of the monitor, the diaphragm to the left, and the kidney to the right.
Fluid is more likely to pool around the spleen than between the spleen and the kidney, and fluid in the left upper quadrant usually represents a splenic injury.
Again, evaluate for hemothorax by looking for a fluid collection above the diaphragm and abnormal continuation of the spinous line.
Pelvic view (suprapubic)
Move the probe to the pelvis. This location is most sensitive for detecting intraperitoneal fluid.
Place the transducer just superior to the pubic symphysis in a transverse orientation with the probe orientation marker to the patient's right. Tilt the probe down into the pelvis and keep it in the midline. Now sweep the entire bladder from superior to inferior to identify free fluid.
Next, rotate the probe 90 degrees clockwise so the probe orientation marker points cephalad. In this sagittal (longitudinal) view, continue to sweep the probe from right to left to evaluate the entire bladder.
The bladder is visible anteriorly and is hypoechoic because it is fluid filled. In a male patient, fluid is most likely to accumulate in the rectovesical pouch, between the bladder and the rectum. In a female patient, fluid most likely accumulates in the uterovesical pouch, between the bladder and the uterus. Rocking the probe slowly from side to side will increase the sensitivity of the examination.
Thoracic view
Evaluate the pleura to identify pneumothorax.
Use a linear probe (high frequency, high resolution, shallow penetration).
Hold the probe perpendicular to the ribs with the probe orientation marker pointing cephalad; start around the third or fourth intercostal space in the midclavicular line. Images should be obtained of both right and left hemithoraces.
To increase the sensitivity of the examination, image the pleural surface at several places along both the anterior and lateral chest wall.
In trauma, when patients often present supine with spinal motion restricted, the most likely place to find a pneumothorax is anteriorly. However, patients can have an isolated lateral pneumothorax. Therefore, it is important to view multiple locations of the lungs.
Hold the probe perpendicular to the ribs. A rib will cast a shadow behind it. The pleural line (white) is visible. Three normal findings are rib sliding, comet tails, and A lines.
Rib sliding will appear as shimmering, grainy mixed echogenicity below the pleural line. It is sometimes referred to as ants on a log. In M-mode, the granular appearance below the pleural line appears as sand on the beach and is called the seashore sign.
Comet tails appear as projections down from the pleural line, moving vertically.
A-lines are an artifactual reflection of the pleural line that occurs about half way between the pleural line and the bottom of the monitor.
If a pneumothorax were present in a trauma patient, there would be no sliding motion at the pleural line, no comet tails, and no A lines.
If unsure of lung sliding, use M-mode over the pleural area. In M-mode, the normal seashore sign would not be present. Instead, a so-called bar-code sign would be visible, which appears as multiple horizontal lines from the top to the bottom of the monitor.

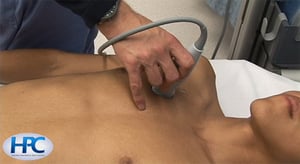
The probe should be placed perpendicular to the ribs. Also note that the probe orientation marker is pointed cephalad.
The probe should be placed perpendicular to the ribs. Also note that the probe orientation marker is pointed cephalad.
Copyright Hospital Procedures Consultants at www.hospitalprocedures.org.
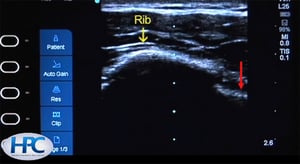
The rib (yellow arrow) appears as a hyperechoic (white) structure with shadowing below the rib. The pleural line (red arrow) is visible in the intercostal space.
The rib (yellow arrow) appears as a hyperechoic (white) structure with shadowing below the rib. The pleural line (red a
Copyright Hospital Procedures Consultants at www.hospitalprocedures.org.
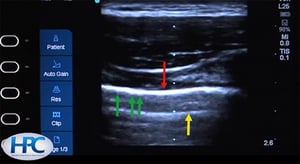
The pleural line is hyperechoic (red arrow). During respirations, rib sliding will cause the pleural line to shimmer and create an appearance of walking “ants on a log” when visualized in a real-time video (green arrows). A-lines (yellow arrow) appear because of artifactual reflection of the ultrasound waves.
The pleural line is hyperechoic (red arrow). During respirations, rib sliding will cause the pleural line to shimmer an
Copyright Hospital Procedures Consultants at www.hospitalprocedures.org.
The probe should be placed perpendicular to the ribs. Also note that the probe orientation marker is pointed cephalad.
The probe should be placed perpendicular to the ribs. Also note that the probe orientation marker is pointed cephalad.
Copyright Hospital Procedures Consultants at www.hospitalprocedures.org.
The rib (yellow arrow) appears as a hyperechoic (white) structure with shadowing below the rib. The pleural line (red arrow) is visible in the intercostal space.
The rib (yellow arrow) appears as a hyperechoic (white) structure with shadowing below the rib. The pleural line (red a
Copyright Hospital Procedures Consultants at www.hospitalprocedures.org.
The pleural line is hyperechoic (red arrow). During respirations, rib sliding will cause the pleural line to shimmer and create an appearance of walking “ants on a log” when visualized in a real-time video (green arrows). A-lines (yellow arrow) appear because of artifactual reflection of the ultrasound waves.
The pleural line is hyperechoic (red arrow). During respirations, rib sliding will cause the pleural line to shimmer an
Copyright Hospital Procedures Consultants at www.hospitalprocedures.org.

Warnings and Common Errors for E-FAST Examination
Knowledge of surface and underlying anatomy is crucial in determining initial proper placement of the transducer.
A normal E-FAST examination does not exclude traumatic intra-abdominal injury (1, 3).
Be aware of anatomical variants.
Technical challenges such as patient body habitus and the presence of subcutaneous emphysema or bowel gas can impede image quality and potentially lead to false-negative or false-positive results.
Tips and Tricks for E-FAST Examination
Dim the lights if possible to help increase contrast and assist gain adjustment.
Decrease the depth when switching from the cardiac to abdominal and then to thoracic views.
Remember that not all fluid appears anechoic (eg, clotted blood may have mixed echogenicity).
References
1. Netherton S, Milenkovic V, Taylor M, Davis PJ. Diagnostic accuracy of eFAST in the trauma patient: a systematic review and meta-analysis. CJEM. 2019;21(6):727-738. doi:10.1017/cem.2019.381
2. Stralec G, Fontaine C, Arras S, et al. Is a Positive Prehospital FAST Associated with Severe Bleeding? A Multicenter Retrospective Study. Prehosp Emerg Care. 2024;28(4):572-579. doi:10.1080/10903127.2023.2272196
3. El-Gendy A, Sobhy T, Hamed M, Esmail H. Study of Extended Focused Assessment Sonography Accuracy versus Computed Tomography in Multiple Trauma Patients. The Egyptian Journal of Hospital Medicine. 2022;89(2):6993-6999. doi: 10.21608/ejhm.2022.272492